Tuesday, June 22, 2010

Fairy on Tiptoe - in earth colours

This sweet little fairy I've colored in earth tones for the Challenge "Sugar & Spice".

Diese süße kleine Fee habe ich für die Challenge "Sugar & Spice" in Erdtönen coloriert.

Stamps: On Tiptoe by Lili of the Valley, Swirl and Medaillion by Hero Arts
Ink: Versafine, Versamagic, Versamark
Tools: Frond Branch Punch (Martha Stewart)
Embellishments: Rose and Pearl Spray by Wild Orchid Crafts
Paper: Creative Memories, Ursus
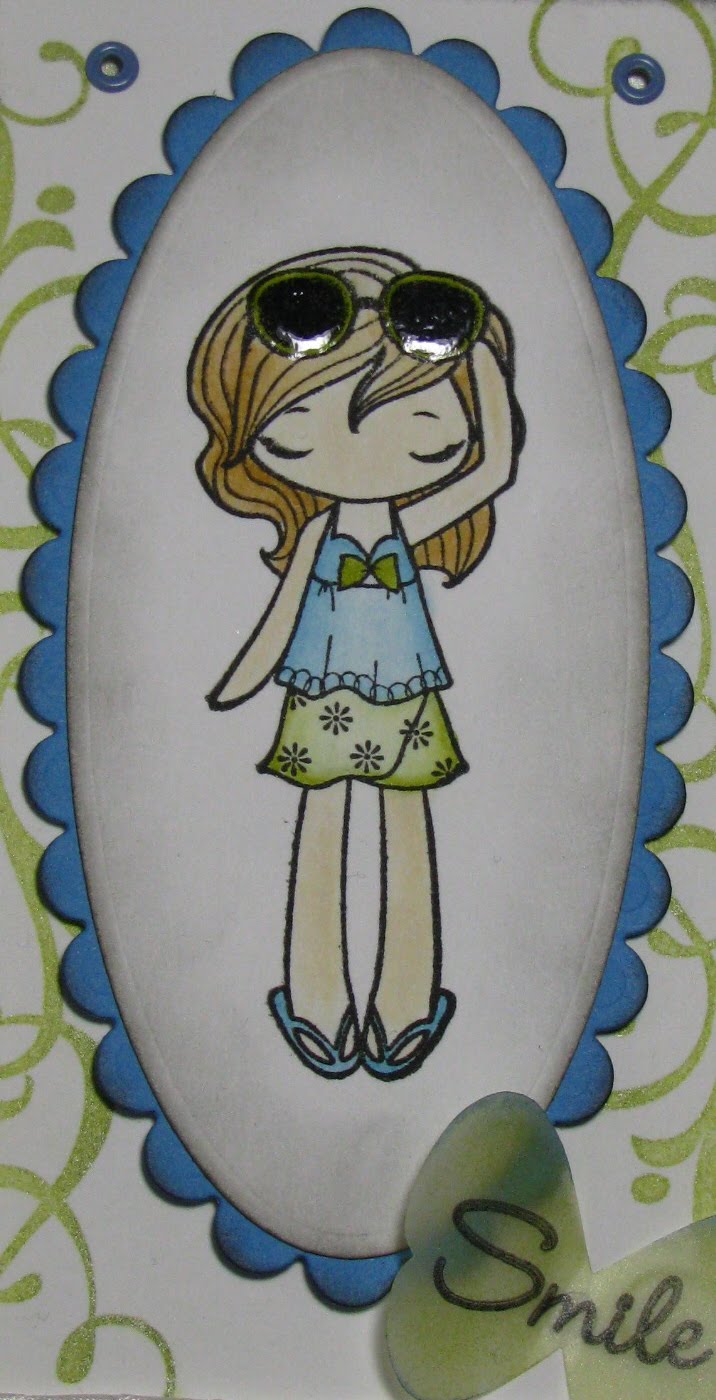
Colored with Distress, Memento, Versamagic and Brilliance Ink, 
Stickles, Glossy Accents, Perfect Pearls

The image is colored with diluted Distress, Memento and VersaMagic ink. After the dress was completely colored, I added Brilliance Ink "Platinum Planet" diluted with plenty of water on the dress, so it shimmers in light. The wings are coated with Glossy Accents and Stickles.


Das Image ist mit verdünnter Distress, VersaMagic und Memento-Ink coloriert. Nachdem das Kleid vollständig coloriert war, habe ich noch Brilliance Ink "Platinum Planet" mit reichlich Wasser verdünnt und auf dem Kleid verteilt, so schimmert es im Licht. Die Flügel sind mit Stickles und Glossy Accents bestrichen.


Mit dieser Karte nehme ich an folgenden Challenges teil:


Lili of the Valley Challenge: Sketch
Colour Create Challenge Blog: Mad Hatter (white with green and orange)
Charisma Cardz Challenges:  All about Bling
Paper Play Challenges:  something old
Paper Sundaes: Pretty as a Princess
Totally Gorjuss: Sugar and Spice 

 
Hugs,

Saturday, June 19, 2010

Shine - a Summer Card with a twist(ed ribbon)

A summer-card: the image is from the TGF-Set "Rain, Snow or Shine" and colored with Distress Ink. The sunglasses are coated with Glossy Accents.

The underlayed watercolor paper is stamped with Swirls in Encore Metallic Ink (Honeydew).


Eine Sommer-Karte: das Image ist aus dem TGF-Set "Rain, Snow or Shine" und mit Distress Ink coloriert. Die Sonnenbrille ist mit Glossy Accents bestrichen.

Das untergelegte Aquarellpapier ist mit Swirls in Encore Metallic Ink (Honeydew) bestempelt. 
 
The butterfly is stamped out of tracing paper and dabbed with metallic ink for a shiny look. The edges I distressed with blue Versamark.

The ribbon is 6 mm wide satin ribbon that I braided. You'll find small tutorial here.

Der ausgestanzte Schmetterling ist aus Transparentpapier und auch mit Metallic-Ink betupft. Die Ränder habe ich mit blauem Versamark gefärbt.

Das Band ist 6 mm- breites Satin-Band, das ich geflochten habe. Ein kleines Tutorial dazu gibts hier.

All elements are mounted with 3D adhesive pads. On the inside I added kraft paper.

 Alle Elemente sind mit 3D-Klebepads aufgesetzt. Innen habe ich Kraftpapier eingeklebt.

 Stamps: Shine by The Greeting Farm, Swirl by Hero Arts
Ink: VersaFine, Brilliance, VersaMark, "Honeydew" Encore Metallic Ink
Tools: Spellbinders Large Ovals, Butterfly & Edge Punch by SU, 
Small Butterfly Punch by CM, Corner Punch by Carl
Embellishments: Satin Ribbon, Eyelets & Glossy Accents
Paper: DCWV Luxury Stack
Colored with Distress Ink

Mit dieser Karte nehme ich an folgenden Challenges teil:
By the cute & girly:  Something old, something new, something borrowed, something blue
Paper Play Challenges:  something old
Stampotique Designer Challenge: What does summer mean to you?
Charisma Cardz Challenges:  All about Bling

Hugs,


Added June 22nd: Valerie from the Stampotique Design Team has featured this card in her post. Thank you very much for your kind words. I really appreciate that! :-)


Tutorial: Braided ribbon / Geflochtenes Band

for my summer card "Shine" I have made a braided ribbon. Here's a little tutorial:

für meine Sommer-Karte "Shine" habe ich ein Band geflochten. Hier ein kleines Tutorial:

I used a 6 mm wide satin ribbon. First, you need three pieces of ribbon with almost equal length. All three pieces should be longer than the length of the braided ribbon so that it can be glued to the back. I cut  15 cm for a braided ribbon of 8.5 cm. The lengh of the pieces depend on how closely you braid them.

Ich habe 6 mm breites Satinband verwendet. Zuerst braucht man 3 etwa gleich lange Stücke des Bandes. Alle 3 Bänder sollten länger sein, als die zu flechtende Band-Länge, damit es noch an der Rückseite festgeklebt werden kann. Ich habe hier ca. 15 cm Band für ein geflochtenes Band von 8,5 cm zugeschnitten. Wie lang das Band sein muss, hängt davon ab, wie eng ihr flechtet.

First I attach all three ribbons next to each other on one double-sided tape (top right on photo). I glue this tape on the back of the card. Then I attach a Tacky Tape (6 mm wide) on my card - starting and ending on the back side.


Zuerst klebe ich alle drei Bänder nebeneinander auf ein doppelseitiges Klebeband (oben rechts im Foto), dass ich auf die Kartenrückseite klebe. Außerdem habe ich ein Tacky Tape Breite 6 mm - beginnend und endende auf der Rückseite auf die Karte geklebt .


I start braiding on the back side, because the beginning does not look beautifully. I attach the braided ribbon on the Tacky Tape, because the ribbon is very smooth and the braiding is easier and even if you glue it on tape.

Ich fange auf der Kartenrückseite an zu flechten, da der Ansatz nicht so schön aussieht. Ich klebe das geflochtene Band auf dem Tacky Tape fest, da die Flechtung von diesem sehr glatten Band so schön gleichmäßig wird.

Probably you've learnt braiding in elementary school, but for all who have not -  this is how to do it:
I begin with a ribbon on the outside, turn it around and stick it diagonally down in the middle. As you can see on the photo now two ribbons lay on one side. Then take the outside ribbon, turn it to the middle and attach it diagonally on the tape. To make sure everything looks nice and even and is centered on the tacky tape, always atach the ribbon at the same angle downwards.

Wahrscheinlich haben die meisen von euch bereits in der Grundschule gelrent wie man flechtet, aber für alle die es nicht gelernt haben, hier kurz wie das geht:

Ich fange mit einem Band außen an, wende es und klebe es schräg nach unten zur Mitte. Wie man sieht liegen die Bänder dann auf einer Seite doppelt. Dann fängt man hier wieder mit dem äußeren Band an und klebt es umgedreht zur Mitte auf den Klebstreifen. Damit alles schön gleichmäßig aussieht und auch mittig auf dem Klebeband festsitzt, sollte man die Bänder möglichst immer im gleichen Winkel nach unten abgeschrägt aufkleben.

Have fun trying this!
Viel Spaß beim Ausprobieren!

Hugs,

Sunday, June 13, 2010

Australia: Penguins at the 12 Apostles

this was a long posting-break from me ... I'm busy lately with so many other things and also constantly tired that I'm doing very little on my creative hobby.

At least I have a scrapbook page from my Australia-Scrapbook for you. On my I have done nothing way more than three months ... I AM SOOO LAZY-CREATING! ;-)

das war eine lange Funkstille von mir... Ich bin in letzter Zeit mit so vielen anderen Dingen beschäftigt und auch dauernd müde, dass ich nur sehr wenig bastele.

Zumindest habe ich eine Scrapbook-Seite aus meinem Australien-Album für euch.An dem ich übrigens auch mehr als 3 Monate lang nichts getan habe... ICH BIN SOOO BASTEL-FAUL!  ;-)

Here are a few romantic Australia Photos:
These are the 12 Apostles - a rock formation off the Australian South Coast near Melbourne. I like that the mood in the photos chances a lot depending on the light. All three photos on the left are photographed within half an hour at sunset.

Jetzt gibt es jedenfalls ein paar romantische Australien-Fotos:
Dies hier sind die 12 Apostel - eine Felsformation vor der Süd-Küste-Australiens nahe Melbourne. Ich mag, dass sich die Stimmung auf den Fotos je nach Lichteinfall sehr schnelländert. Alle drei Fotos links sind innerhalb einer halben Stunde bei Sonnenuntergang fotografiert.

At dusk the penguins waddle across the beach to the sea. The penguin photo is stamped with Staz On. "I'm walking" is a reference to the Fats Domino classic.

Abends watscheln dann die Pinguine über den Strand zum Meer. Das Pinguin-Foto ist mit Staz On bestempelt. "I'm walking" ist eine Referenz an dem Fats Domino Klassiker.


Incidentally, tonight is the first World Cup football match of the German team.

GERMANY vs. AUSTRALIA         

I must admit I have not decided yet which one of the teams has my support. Who plays better should win, and it's not always like that in soccer.

Übrigens: heute abend ist das erste WM-Fußball-Spiel der deutschen Mannschaft.  

DEUTSCHLAND gegen AUSTRALIEN            


Ich muß zugeben, ich habe mich noch nicht entschieden, wer von den Mannschaften meine Sympathien hat. Wer besser spielt, sollte auch gewinnen, und das ist ja nicht immer so beim Fußball.

Now I get my Vuvuzela and wake up all of my neighbours! ;-)

Und jetzt nehme ich meine Vuvuzela und wecke die Nachbarn! ;-)

Hugs,

Tuesday, June 1, 2010

Girl with Heart Purse in Purple

Das Image wurde mit verdünnter VersaMagic Tinte coloriert. Das Oval ist mit VersaMagic in lila und ein wenig schwarz distressed und dann mit Perfect Pearls bestrichen, so dass es im Licht glitzert. Die Schleife und die Tasche sind mit Glossy Accents hervorgehoben.

The image is colored with diluted VersaMagic ink. The oval is distressed with VersaMagic in purple and a bit of black and Perfect Pearls dabbed on it, so that it glitters. The bow and the purse are highlighted with Glossy Accents.

Die Blume ist mit einem klaren Embossing Stift an den Rändern bestrichen und dann lila Perfect Pearls darauf verstrichen, außerdem noch etwas Stickles.

The flower is coated with a clear embossing pen at the edges and then purple Perfect Pearls added on it, also a little Stickles.
 Das Ticket ist auf Fotopapier mit Brilliance gestempelt. Vorher ist es  mit VersaMagic und einer Speedball-Walze lila gefärbt.

The ticket is stamped on photo paper with Brilliance ink. Before that, it is colored with VersaMagic and a speedball brayer.
Stamps: Girl with a heart Purse by Stampotique, 
Flourishes by Inkadinkado, Tag by SU
Ink: VersaFine, Brilliance
Tools: Martha Stewart Border Punch, Spellbinder Large Ovals
Embellishments: Flower, Buttons, Ribbon
Paper: Glossy white Paper, Design paper by CM
Colored with VersaMagic Ink

Mit dieser Karte nehme ich an folgenden Challenges teil:
Create4fun Challenge: Sketch
Stampotique Designer Challenge: purple
Stamp Something: birthday recipe
Kaboodle Blog:  3 papers, 2 embelishments, 1 image
Spoon Full of Sugar:  Celebration card
Secret Crafter:  Buttons & Blooms
Creative Inspirations:  distressed
Crafts & Me Challenges: distressing
Totally Paper Crafts: Monochrome
Hanna & Friends Challenge: Monochrome

Hugs,